
Ever seen a tech drawing? You know, those blueprints? They’ve got weird symbols all over. Little triangles. Lines. Hook things. These are machining symbols. And they’re super important!
These tiny marks tell workers how to finish surfaces. Should it be smooth? Rough? Leave it alone? Without these symbols, nobody would know what to do. Which tool to use. How much stuff to cut off. It’d be a mess!
Let’s break it down. I’ll show you what these symbols mean, how to read them, and how they work in real life.
What Is a Machining Symbol
A machining symbol is a tiny mark on a drawing. It tells you how to make a surface or treat it. Should you cut it, grind it, polish it, or just leave it?
Think of it like a note. A little tag. The designer draws a part, then adds this symbol. Now the factory guy knows exactly what to do.
In machine design, small things matter. Even tiny surface changes affect how parts fit, how they move, and how long they last. That’s why these symbols rock!
Why Machining Symbols Are Important
These symbols keep everyone on the same page. Without them, total chaos! One guy polishes, another leaves it rough. Parts won’t fit. Big problem!
Here’s why they matter:
- Accuracy: They say exactly how smooth things should be.
• Quality Check: They help measure if parts are right.
• Save Time: They show which process to use.
• Same Every Time: All parts come out identical.
• Save Money: No extra work, no waste.
Like, if one part slides on another, the symbol says “make it smooth!” But if it just sits there, rough is fine. Simple!
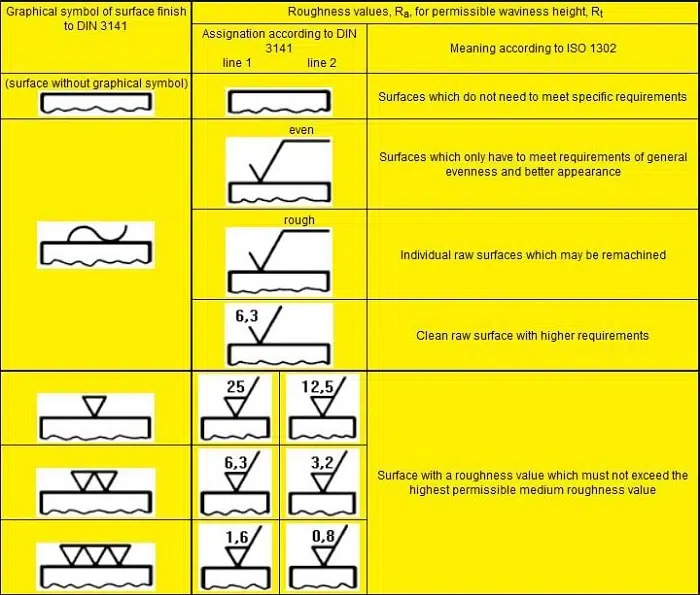
Basic Shape of Machining Symbol
The symbol is super simple. Two short lines, like a check mark. Sometimes it has extra stuff — lines, numbers, more details.
Here’s the basic look:
See that V shape? That’s it! It means “machine this surface.” Then you can add more info on top — numbers, text, whatever you need.
Let me show you more.
Types of Machining Symbols
You’ll see a few types. Each means something different.
Type 1: Basic Machining Symbol
Just a simple check mark, no extra line on top.
It means: Cut this surface! Mill it, turn it, whatever.
Type 2: Don’t Touch It!
Check mark with a line on top? Leave it alone!
Don’t machine it. Keep it as-is — after casting, after forging, just leave it.
Sometimes roughness is good or needed.
Type 3: Special Stuff
Want something specific, like grinding? Add text above the symbol.
Example: Ra 0.8 means super smooth. We’ll talk about that next.
Surface Roughness and Ra Values
See numbers like Ra 3.2 or Ra 0.8? That’s rough!
Ra means Roughness Average. It’s tiny bumps on the surface, measured in micrometers (super tiny units). Small number = smooth. Big number = rough.
Check this out:
| Surface Finish | Ra Value (µm) | What It’s Like |
| Super Smooth | 0.2 – 0.8 | Like a mirror |
| Smooth | 0.8 – 1.6 | Nice and clean |
| Normal | 1.6 – 3.2 | Regular machining |
| Rough | 3.2 – 6.3 | As-cast look |
| Very Rough | Above 6.3 | Raw surface |
So Ra 1.6 means pretty smooth. You’d use fine tools or grind it.
Placement of Machining Symbols in Drawings
Where do these symbols go? Right on the surface line! The symbol points at what needs work.
Like this:
• On a line: Symbol sits above it.
• With an arrow: Arrow points from symbol to surface.
Got lots of surfaces with the same finish? Just write “All surfaces Ra 3.2 unless noted.” Keep things clean!
Additional Information You Might See
Symbols can have extra info:
- Ra Value: How smooth?
• Tool Marks: Which direction?
• Extra Material: How much to remove?
• Method: “Grind” or “Polish” notes.
Example:
Polish
Ra 0.4
This says: Polish it! Make it Ra 0.4 smooth!
Direction of Lay
Lay means tool marks — the pattern left behind. These marks matter! They affect how parts fit and slide.
Common patterns:
| Symbol | What It Means |
| — | Lines go one way |
| X | Lines cross |
| M | Lines go everywhere |
| C | Circle pattern |
| R | Lines from center out |
Turned parts? Circle pattern. Ground parts? Cross pattern. Does it make sense?
Machining Allowance
Sometimes parts are cast first, then machined. You need extra material! That’s the allowance.
Example:
2.0
Leave 2.0 mm extra. The machinist cuts it off later. Simple!
Standard References
These symbols work worldwide — same everywhere. The main standards:
- ISO 1302 (World standard)
• ASME Y14.36 (USA)
• JIS B0031 (Japan)
They all say the same thing. A symbol in China? Same as the USA. Cool, right?
Reading Machining Symbols: Step-by-Step Example
Let’s practice! You see this:
Ra 1.6
Step 1: Check mark = machine it!
Step 2: Ra 1.6 = make it this smooth.
Step 3: No top line = definitely machine it.
So cut or grind until it’s 1.6 smooth. Got it?
Another one:
──── Ra 6.3
Top line means NO machining! Leave it rough. Ra 6.3 from casting is fine.
Also Read: How to Get the Rupee Symbol on Keyboard: Simple Steps for Every Device
Common Mistakes When Reading Machining Symbols
Even pros mess up! Watch out for:
- Missing the top bar — that means “don’t machine!” Forget it? Wasted work.
• No units — Ra needs micrometers, always!
• Wrong spot — Symbol must point right, or you’ll finish the wrong side!
• Too smooth — Making it smoother than needed costs time and money.
Always double-check!
Tips for Designers and Students
New to this? Here’s help:
- Don’t go symbol crazy. Each one costs money.
• Use general notes. Saves space.
• Pick roughness based on use, not looks.
• Follow standards, always.
• Talk to machinists. They know stuff!
Machining Symbols in Real Life
These symbols guide everything: car parts, plane parts, all of it!
Examples:
• Engine pistons: Super smooth, low Ra.
• Gear teeth: Ra 0.8, less friction.
• Cast molds: Often no machining, top line symbol.
• Bearings: Polish to Ra 0.2 or better.
Every symbol helps parts work right!
Summary Table of Meanings
| Symbol | What It Means | Machine It? | Example Ra |
| / | Machine this | Yes | 1.6 |
| ─/ | Don’t touch | No | 6.3 |
| / with text | Special work | Yes | 0.4 |
| / with number | Extra material | Yes | 2.0 |
These tiny symbols? They’re huge! Like a secret code. They connect design to making stuff. Get them right, save time, avoid mistakes, and make perfect parts.
New to this? Don’t worry! They look scary, but they’re not. Learn the basics: what each line means, each number. Soon you’ll read any drawing.
Next time you see that little check mark, you’ll know how to make it, how smooth, and whether to machine it at all. Pretty cool, right?